
DOWNLOAD THE APP


Customer Services
Copyright © 2025 Desertcart Holdings Limited
DOWNLOAD THE APP


🚗💎 Elevate your ride with the ultimate ceramic armor—shine, protect, and dominate the road!
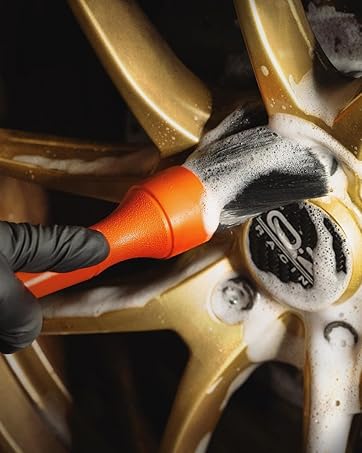
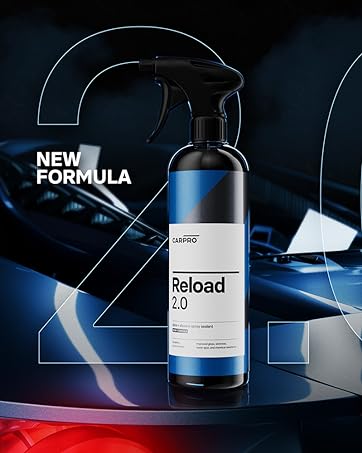
CARPRO CQUARTZ UK 3.0 is a premium 50ml ceramic coating kit featuring 70% ultra-pure silica quartz nanotechnology that bonds to multiple surfaces including paint, glass, metal, and plastic. It creates a durable, chemical- and UV-resistant glassy layer that enhances gloss and repels water and dirt for up to 24 months. Designed for professional and enthusiast use, it includes applicators and a maintenance booster (Reload 2.0) to ensure long-lasting protection and an effortless wash experience.


| Brand | CARPRO |
| Color | Clear |
| Finish Type | High-Gloss |
| Item Volume | 50 Milliliters |
| Size | 1 Count (Pack of 1) |
| Special Feature | Reflective, Scratch Resistant, UV Resistant, Washable |
A**C
2 Year Update below! Impressive!
See attached video review for the 2 year update since initial application. Original review is below: Pictures do not do justice for this product, but first some pros and cons: Pros: -Excellent product has amazing effects and protection for your car. -Very user friendly, even for weekend warriors. -Although expensive, should be a good value due to longevity. -Way better than legacy products like waxes, sealants, etc. This is on a whole new level. Cons: -From reading reviews and my own experience, vendor is regularly delivering expired product. While it is unknown how expiration will effect longevity, product was tackier than normal. If you get expired product, send it back. I could not due to my time constraints. Do not support poor fulfillment. -A tremendous amount of prep work is required to get best results. That’s not necessarily a negative as you need to put in the sweat to get good results like so much in life. Be prepared to spend 6, 8, or 12 hours or more on prep work like wash, clay, decontamination, compound (if necessary), polish, IPA wipe, and 2 applications. -Get a big bag of fresh microfiber towels from Costco or similar and use them once during application, then toss them. They will cause scratches in your finish is you try to use again, even after washing. -Get yourself extra applicator pads. You will need them and be happy you change them frequently. This product is the real deal. Check out your applicator pads a couple of days after you used them and you’ll see why it’s important to change frequently and never reuse microfiber used during application (pads become rock hard). Water behavior and sheeting of dirt is really incredible. I’ve never seen beading like this before, and you can even use water to dry your car as illustrated in the attached video. All those hours of hard prep work will now be sealed for 24 months or more, making maintenance washing a breeze. You might not even need to use soap or a wash mitt in the future because so much is repelled. Overall great product but disappointing that vendor is delivering expired products. If yours is expired, send it back. I’m sure the manufacturer would prefer you do that as to not soil their reputation. If you get pushback I’m sure your credit card issuer would back you in a dispute. Expiration dates exist for a purpose. UPDATE: I did my first contact wash since application 2 months ago and it was the easiest car wash I’ve ever done. Very happy to see water performing as advertised and what little dirt that was on it i think came off with the initial rinse. I really didn’t notice any dirt in my bucket or microfiber wash mit although I’m sure there was some. I think I spent 30 minutes total on washing and most of that time was setting up the garden hose, filling the bucket, and getting an extension cord along with micro fiber towels which I didn’t even use. I dried the car with a leaf blower and the water flew off. I did add a topper of Griots Ceramic Wax since I’ve had great success with it as a stand alone and I prefer that over Carpro Reload. That process took an additional 20 minutes or so and was a breeze. Keep in mind when viewing the pictures that this is a 4 year old used car (50k miles) and a daily driver that is not garaged, although it is in an open parking deck. It has over 2,500 miles on it since the initial application. I’m very happy with the results and the longevity so far. I hope to enjoy the same ease of use and success over the next couple of years and will keep updating. Update: 4 Months since application and went to do a contact wash. First rinsing the car, the beading is still doing as good as the day applied - see captioned photo. Was the easiest and fastest wash ever. Looked better than new when done.
M**A
Cquartz UK 3.0 Gives Protection and Lasting Brilliant Shine but Beware!
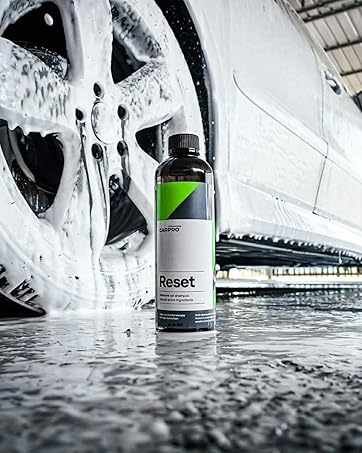
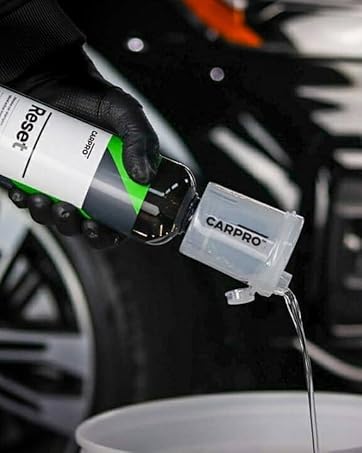
This product is stellar for the protection it offers and the brilliant shine. Installation requires several things to be in order; First, wash car thoroughly with a good automotive shampoo. Second, decontaminate paint---use Iron by Car Pro to neutralize the embedded iron and other contaminants which are present in ALL car surfaces. Third, now is the time to get your color correct light and check painted surfaces for any imperfections. This is the time to correct your car's paint with a dual action buffer and some kind of compound. If you have a lot of swirls, scratches, haze...you will need to compound your paint to rid it of imperfections: "But why Patrick I just want to put a ceramic coating on my car?" The ceramic coating will lock in your paint's condition whatever that may be. Swirls, scuffs, haze, will all be evident under the ceramic coating. Ceramic coating will in no way correct your paint. Therefore, unless you want to display the imperfections in your paint for the next 12-24 months you will need to correct the paint. Fourth, after the paint is defect free, you will need to remove any residual polish, compound, oils, anything which might stand between your paint and the ceramic coating. Here you can use Carpro Eraser, Geyon Prep, or a solution of IPA and water. These will remove waxes, compounds, and anything else that may be on your paint after the correction stage. NOW, and only now, can we begin to consider applying the coating. Make sure your vehicle is out of the direct sun, preferably in the shade but away from possible contaminants like bugs, pollen, and dust. Consider a clean garage with good ventillation. Caution: you do not want to breathe the fumes from the coating as they can cause health problems. Apply coating in a well-ventilated area. If you do not have access to a well-ventilated area I suggest either a respirator or pollen/dust mask. Now that your car is clean and the paint is defect-free, and you are in a dry, well-ventillated area with no dust, bugs, or other contaminants, you can begin to apply the coating! I suggest using the included applicator bar with the enclosed applicator sheets. Open the bottle and dispense 4-5 drops of the fluid on your applicator. Start on the roof as it is usually level and free from crazy contours. Do a small section of roughly 3-4 feet by 3-4 feet. Wipe the coating in straight, overlapping lines, from left to right so that you have complete coverage horizontally. Then use a similar pattern going vertically over the same area. This way you are assured of having complete coverage with no holes. I suggest slow methodical movements until complete. Depending upon the temperature of the area you are working in, this will dictate how long you have to wipe the area of excess product before the coating begins to cure. A good rule of thumb is to begin wiping the treated area as soon as you finish application. This way you can't go wrong. If you notice the surface is getting tacky as you wipe it, you have waited too long and will need to reapply coating on this area. Keep several short-weave micro-fiber towels on hand that you are ok throwing away as you will not be using them on your car at least ever again. Flip the towel often as you use it to wipe the treated area. Once the area is treated and wiped down, begin the next area. Check your work for dark spots which indicate you have too much coating applied. Once the entire car is treated, you will want to check for holes in coverage and dark spots. Apply more coating to the areas lacking and wipe down the dark spots. Now, I suggest you do not drive your car for the next 2 days. If you have no other choice, make sure you do not get the car wet at least for the first 24 hours. PERIOD, NON-Negotiable! If you do get the car wet, wipe any wetness down immediately before it ruins the curing process. After 48 hours you can take the car out for a spin but avoid contaminants. Personally, I let the coating cure for 4 days and did a second coat of product. After this coating, I waited 5 full days before I took the car out of the garage. The results were out-of-this-world! Here is another caveat: Once the ceramic coating is applied and fully cured, you are not done! Oh no, my friend, you have to take care of the coating for it to last. Do not think about washing the car for the first 7 days after treatment. When you do finally wash the car you must use a ceramic enhancer like Car Pro Reset Intensive Care shampoo which will not damage the coating. Next you will want to apply Reload and often to recharge the silica content of the ceramic coating. If you take good care of the coating it will last 12-24 months. Having this coating does not give you license to neglect your paint! If you do, the resulting imperfections from tree sap, pollen, bird poop, left to dry will be having to buff off the entire coating and start over! Highly recommended IF.......
C**Y
Ease of install and thst it works.
3rr time using this product. This one came with a required spray. As all ceramics the prep is where its at. Product applies easy. Honestly easiest part of the whole process. Due to time and weather restrictions, I didnt get 2 coats on or the cure time required. But having the inclement weather and after work immediately to a car wash very evident the product did its job. Less effort to clean and shedding water. Definitely suggest this product.
A**X
Makes my 16 year old car look new!
First, I just wanted to say, WOW, the level of gloss from this ceramic coating is unbelievable. Completely transforms the looks of my 16 year G35! This was my second time applying a ceramic coating, so I am still a bit of a noob when it comes to this, but I had an overall great experience with Carpro's product. My prior experience with a ceramic coating was using Avalon King's IX coating on my Elantra N, however I am pretty disappointed with their product. I followed all the correct steps, however after just 3 months, it started to degrade in the most sun-prone areas (roof, windshield, hood). Since my vehicles sit outside 24/7/365, it is important to me that my cars are properly protected against the elements. So, I did some research and saw many youtubers recommending Carpro UK 3.0 and decided to give them a shot! For those wondering, this does take awhile to do, so I would recommend blocking off a weekend. Start to finish took me about 14-15 hours (wash, iron decon, clay, compound, polish, prep spray/wipe, 2 layers of the ceramic and one topper layer of Reload). Of those 14 hours, the last 4 or so hours was applying the coating itself. It's best to go slow and watch for high spots. The 3.0UK ceramic coating does come off pretty easily, just like the Avalon kings armor shield IX. The Reload however was a PAIN to buff off. Did as the instructions said, however, I found multiple streaks around my car which I didn't notice until the next day. Some came off easily, some did not. Make sure you have extra good lighting when applying Reload and spend some good time removing it. Even though I had some small hiccups, the results speak for themselves. I don't think I have ever seen such deep gloss and mirror-like paint with any previous products I've used. Thoroughly impressed and I wish I had found out about Carpro's ceramic coating earlier! I can't wait to apply it on my other vehicles! Will update on longevity.
W**.
Pretty good product. Reload needs better instructions.
I discovered this product from a YouTube video where someone tested a variety of these coatings on his hood in different segments and showed the results a year later. Out of 30 or so different types this coating was one of the 6 that was still working. Installation of this is pretty easy and forgiving. I’ll cover a couple things that the instructions don’t mention. 1-you either need to have a new vehicle or clay bar it. Any smudges, bug guts, water spots, etc will be stuck on there after application. 2-the instructions say to replace the mini cloths after every 1-2 panels. There really are not enough of these cloths to do that if you are applying 2 coats. I would use one cloth for 1/4 of the vehicle and then flip it over for another 1/4. 3-the instructions say to spray the reload after application. This pretty much ruins the appearance you are looking to get. I’ll update this part when I get some clearer instructions. For now I would say buff it off or don’t use it. See my photos. (Edit-so far it isn’t letting me add photos. Due to staff shortages they disabled as doing photos)
D**M
Lots of work but outstanding results!
I bought a 2010 mustang gt last year and paint correction was on the to do list untill I finally took on the task two weeks ago. I had 2 uv damaged bumpers that needed repainted and the rest of the cars paint was badly neglected. Tons of swirl marks, small,medium, and deep scratches. I needed to do bumper repaints and full paint correction with lots of chip and scratch touchups. Because i had to strip, compound buff and polish I figured id try a ceramic coating. After loads of research I chose this product. After 2 weeks of stripping,cleaning, clay bar, painting, touch ups, wet sanding, compounding and polishing with a dual action buffer I was finally ready to apply the cquartzuk3. Once all the above was done I did a 1/1 wipe of the surfaces with distilled water and isopropyl alcohol. Garage was heated to 65f. For each roughly 2x2 or 2x3ft section I would use a whole line of product. It would glide on smoothly but within 10 seconds felt like smearing rubber cement or syrup but i would just slow down and continue to spread the product... I just went horizontaly then verticaly.... Once each direction for each section. I started out wiping off the product right away as i read to do but found if i did it just looked "flashed" or rainbow like again 10-20min later and even if i waited 30 min it was still like wiping oil around so i just uniformally applied to each section/panel and after 10-15min of applying i would go back and start buffing what i had applied. This is different than what ive read but worked fine for me. I let it sit 24 hours and applied a second coat. This time i applied to the whole car a pretty thick coat and then went back with a single new mf towel and buffed the car. After 20 min I used a new mf and lightly rebuffed entire car and it came out looking amazing! Some have seemed to have issues removing product if not within a certain time period but i just "winged" it with what worked for me. Black shows ALL defects and now the paint looks stunning! I even applied to plastic and rubber trim and headlights and it all turned out great! My brother in law asked if I repainted the car! I just finished second coat and will wait a couple days then hit with reload. Not sure about longevity yet but read it will actually get more glossy after a week cure! Sofar im very impressed... Its added so much depth and wet shine!
S**O
Easy to apply protection for your paint.
This is an easy to use enthusiast ceramic coating product. Two coats last a long time and make the car easier to keep clean.
E**R
Professional grade while easy to use
So many auto detail guys try to make ceramic coatings way more complicated than they really are either so they can charge huge money for a professional application and/or publish click bate videos that imply you have to do it their way. Yeah you can, worst case, leave some streaks (so called "high spots") on your paint if you use a crappy no-name Chinese product or completely ignore the directions with a decent product. But, with a really high quality product like Carpro Cquartz UK 3.0, you honestly have to work hard to screw it up beyond just needing an added wipe. It's the most forgiving quality ceramic coating I've yet tried. There are multiple credible YouTube videos comparing and torture testing over time muliple coatings and all of them I've seen rate Cquartz as among the top few that survive the longest. That mirros my own experience. That said, Turtle Wax Hybrid Solutions Ceramic Coating has also done really well in real world tests. Cquartz might last 24 to 36 months when properly applied and well cared for. While the Turtle Wax product is likely to last half as long but still impressive given it's much lower price. But the Turtle Wax product is around one fourth the cost so you could apply it Some would lead you to believe you have to invest countless hours in a 7+ step prep for any ceramic coating but that really depends on your goal? If you consider your paint acceptable as-is go to your local CVS, buy a bottle of isopropyl alcohol for a few dollars, dump it into a spray bottle, add a couple drops of dish washing detergent, and you have essentially the same thing as Carpros Eraser at around one tenth the price. Wash your car well, dry it, apply the alcohol mix or other prep product, wipe it off with a microfiber towel, and you're good to go if you're happy with your paint. If you your paint has issues you want to correct do your best to fix them before the alcoholwipe down.
Trustpilot
2 months ago
1 month ago