
DOWNLOAD THE APP


Customer Services
Copyright © 2025 Desertcart Holdings Limited
DOWNLOAD THE APP
🌪️ Spin into Style with VINGLI's Windmill Wonder!
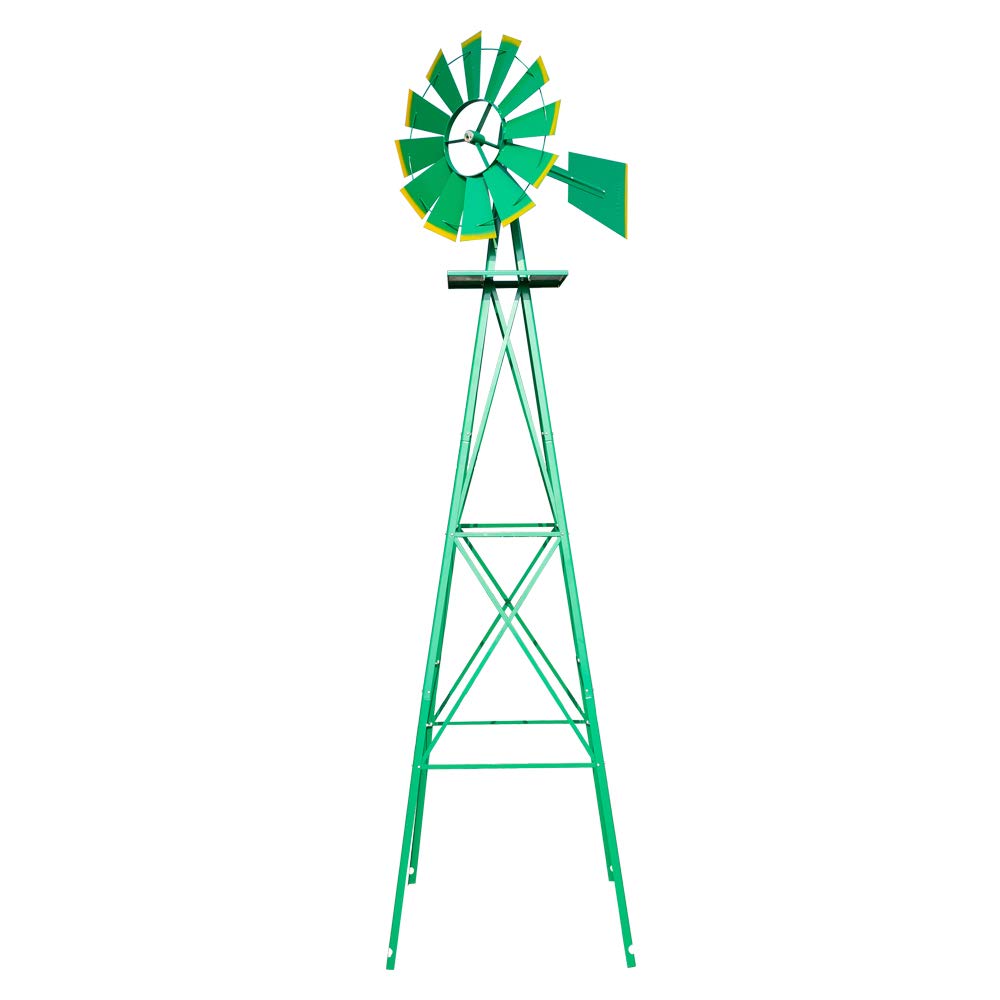
The VINGLI 8FT Ornamental Windmill is a heavy-duty garden decoration made from solid steel, designed for easy assembly and weather resistance. Its unique ground anchorage system ensures stability in windy conditions, while its wind-powered operation provides a quiet and charming addition to any outdoor space.
H**F
These instructions and photos will help to assemble!
The writers of the instructions must have assumed that buyers don’t need instructions, so they gave us a few pictures, sort of! Therefore, here are some things that this mechanically-skilled 75-year-old woman figured out. Granted, these instructions aren't perfect, but with the photos, they are better! Just possibly someone else can assemble their windmill is less than 6 hours.PREPARATION:1. Open the box in a place where you can easily vacuum up the hundreds of escaping tiny pieces of hard Styrofoam.2. Have a large work surface to spread out all the pieces.3. Have three or four small bowls to sort the bolts, nuts, washers, and cotter pins, which come in one envelope. (The included instructions call bolts “screws.”)4. You will need a Phillips head screwdriver, a 5/16 open end wrench, and needle-nose pliers.5. For the sake of appearance, insert bolts from outside toward the inside.6. Initial assembly can be done indoors, but at halfway, move outside due the height of the windmill.7. Two sawhorses come in handy for the final assembly to support the tilted windmill. (You need to lower it to reach the top.)8. Corner Legs: There are 12 Corner Leg pieces. The 4 shorter ones are the top of each leg. The 4 of the longer ones with a large hole in one end are the bottom of each leg. The other 4 of the longer ones are, of course, the middle of each leg.9. Braces: There are 16 “longest” Braces which are the diagonal supports. There are 8 Braces which are the horizontal supports; the 4 shorter ones form the middle box, while the 4 longer ones form the bottom box. The holes in the ends of the Braces tend to be small, making it impossible to get a bolt through unless “screwed through.”ASSEMBLY: {The photos are out of order in the published review. Sorry.}1. Assemble the spinner (Wheel) unit first. [photos 1, 2, 3]. There are 2 Tiller pieces. The Linker rod and the Rudder are sandwiched between these 2 Tiller pieces. To attach the Wheel (spinner) to the Linker, put a large washer on the rod, then the Wheel, then another large washer. Then put a cotter pin through the hole at the end of the Linker, and then use pliers to spread the prongs of the cotter pin, to keep it from sliding back out. Set this unit aside for now.2. The top section. Each of the 4 Corner legs of the windmill consists of 3 pieces which are bolted together. Start with the shortest 4 Corner Leg pieces.3. [photo 4] Using a bolt, attach a Leg piece to each of the 4 holes in the boxy Master Head. Next put a small washer on the bolt. Then put on the nut but leave slightly loose. This stage is very awkward because the legs are loosely attached and they flare out as they are supposed to—4 legs moving everywhere!4. [photos 5, 6]. Attach a longer Leg piece to each of the Leg pieces you have just put on the Master head. The indented end of these pieces fits inside the piece above it. Washers are not used from now on. Do not securely tighten yet because crossbar Braces are coming.5. Now attach the third Leg piece to each leg, the piece with the large open hole which is the bottom of the windmill.6. [photo 7] Stand the windmill upright and slide the flat Platform on top, sliding it down to the first set of bolt holes on the Legs. (smooth side up).7. [photo 7]. Select 8 of the 16 longest Braces and include one end of each on the Bolt used for attaching the Platform to the Corner Legs. The Braces dangle loose for now. Leave the nuts and bolts loose for now. That finishes the top section.8. The middle section. Select the remaining 8 “longest” Braces, and the 4 mid-sized (Center) braces. These 4 mid-sized braces will form a square box horizontally.9. [photo 8, 9] Pull a long Brace diagonally from the top to the side (the holes will match up). Then bolt – all 3 at the same time -- the diagonal Brace, another “longest” Brace which will dangle down for now, and one end of a Center brace. Do this for all 4 corners. [photo 10] The 4 Center Braces form a horizontal square box. That finishes the middle section.10. The bottom section. You probably need to take everything outside now because the windmill is getting too tall for most ceiling heights. Pull each dangling Brace diagonally to the side. Place one end of the remaining Braces (Bottom) with it and secure with bolts. [photo 11] This forms another horizontal square box.11. You now have all the long braces secured diagonally, and all the center braces secured in two square boxes.12. Now go back and securely tighten all the bolts and nuts with your wrench and screwdriver. (An open-end wrench works better than a closed end because of the small spaces.)13. [photo 12] To finish the windmill, lean the whole thing down (on sawhorses, perhaps) and put the Wheel unit on: Place a large washer on the rod extending down from the Tiller, insert the rod through the hole in the Master Head, and then put a cotter pin through the small hole in the bottom of the rod. Using pliers, spread out the prongs of the pin to prevent the pin from coming out.14. Place the windmill on the ground where you want it and then put a Ground Stake through the hole in each Leg. [photo 13--This photo shows the old stakes I used because they were longer.]15. [photo 14] Wait for some wind and enjoy watching it spin! It was worth the effort!
J**N
Looks great!
Windmill looks and works great. Lot's of nuts and bolts. Took a while to assemble.Tip #1... throw away directions, they are useless and confusing.Tip #2... wach video on YOU TUBE. It's more helpful and easy to understand.
L**R
Good value for the $
Nice product the instructions are not that clear. Take your time do not rush or tighten screws until the end. Test fit parts some have specific orientations that are not clear in instructions. Took me about a day very tedious and time consuming but worth it in the end. Looks great!
B**T
Great backyard Windmill
The media could not be loaded. I absolutely love this windmill and it looks great in my backyard. I just wish the instructions to assemble it were a little better. Maybe a better exploded view with labels on the legs to know which ones are the two top portions of the legs. The bottoms are easy to tell because of the holes at the bottom of them for the stakes. Once I figured the legs out, it was a breeze to assemble with a Phillips screwdriver and an 8mm Open End, Boxed End wrench. I wish there was a Zerk fitting to shoot some grease for the wheel like my old windmill had to lube up the bearings to protect them and help make them last longer.
M**S
very nice windmill.
This windmill is nicely made and turns very smoothly and quietly. Nice and sturdy. I did install bigger anchors due to the fact that my lawn is very sandy. The only beef I had with it was the assembly instructions. Not very clear in the directions and all of the illustrations were fuzzy looking. Once I got it assembled ,I love it and it was just what I wanted for my yard.
W**R
fun yard ornament
Love this in our country yard. Directions for assembly were a little hard to follow, but we got it done. So far it has lasted through a harsh winter. I am happy with it for the price.
B**Y
Wind vane B+ instructions F-
It's pretty nice now that it's finally together but the first step is to take the instructions and light them on fire.
G**S
Cute and a "eye catcher".....
I had purchased similiar windmill for my home here in California....a special lady friend in Arizona say it and wanted to know where I had purchased it...I told her AMAZON....and I ordered 1 for her...delivered within 2 days and she put it together by herself....and loves it....I bought the GREY unit...she wanted the RED....everybody is pleased and the little mini {8' windmill} is just what we both wanted...Thanks
B**L
Arrived well before delivery date
Haven't put it together yet, seems like ok quality.Red paint coat is thin and rubs off...I'm sure it won't last very long.
C**Y
Don't waste your money
The wheel with the blades on it is welded crooked, it will tear the bearings out if it is put up this way. JUNK
D**E
Shipped in good time.
I bought as a Christmas gift so it has to be put together before I know whether or not I like it and that won't happen until after Christmas, however it did get here in good time.
D**R
Not to bad
Without the blades even turning the blades look welded wrong. No stress marks packaging wad fine, the fabricator should check their welding figures for straight.. I WIL not put this up in my yard until I have straightened it. Otherwise looks good.
M**T
Just what I was looking for!
This windmill is cute awesome. The only thing was the instructions weren’t that good but once I figured it it was easy to put together!
Trustpilot
3 days ago
1 month ago